Wednesday, November 22, 2006
WARNING!!
Please Make Sure Your Laptop's wireless card is using Intel. Or else DO NOT! I repeat... DO NOT! Install the intel software. If you are not sure if you are using intel please check with a reliable friend. (e.g Kelvin)
*I will not be responsible if u screwed your laptop. Cheers! ^.^
Tuesday, November 21, 2006
Pictures To Guide You

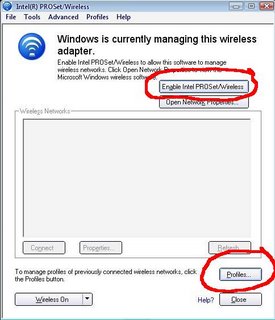
2) Enable Intel Proset/Wireless then click on profiles.
 3) Now click on Add
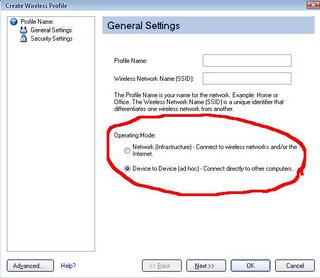
4) Creating the Ad Hoc connection!

Note: Your Screen may not appear the same as mine. If this 4 simple steps don't help, refer to the other guides below. But i am sure you gamers are smart enough to get it. Its very SIMPLE. If any problems, email me dexxter@gmail.com or MSN: d7422452028@hotmail.com
Support! www.dexxter.co.nr
Mind helping me Click on the ads ^.^ Thanks!
Enabling Intel(R) PROSet to manage Your Wireless Connections
Enabling Intel(R) PROSet to manage Your Wireless Connections
If you are using Windows XP as your wireless manager the following described how to enable Intel(R) PROSet as your wireless manager.
- From the Desktop, Click the Start button > Control Panel. If you are looking at the Category View of Control panel, click switch to classic view . If you are looking at the classic view of control panel, go to the next step.
- Right-click Network Connections, then click Open.
- In Wireless Network Connection Properties, Click the Wireless Network tab, verify that the Use Windows to configure my wireless network settings checkbox is clear (unchecked).
- Double-click the Intel(R) PROSet icon in the desktop task tray.
- If you have previously setup your profiles, click the Networks tab. The profile list should display available networks to connect to. If no profiles have been established, refer to Creating a New Profile for more information.
Once you are in Profile Wizard!
Click on Images to enlarge
 Click on images to enlarge!
This is the part where you set the passwords to your Ad Hoc connection!

Connecting to a Peer-to-Peer (Ad Hoc) Network
In peer-to-peer (ad hoc) mode, you can send and receive information to other computers in an ad hoc network. All wireless clients in the ad hoc network must use the same network name (SSID) and channel number. For a list of allowed 802.11b ad hoc channels, refer to the Adapter Settings for more information.
![]()
NOTE: While scanning with an ad hoc profile set to a specific transmit channel, if an ad hoc network is found on another channel, you will be connected using the new channel. The new channel number is displayed in the Adapter Settings.
Connect to an Ad Hoc Network
![]()
NOTE: For information about connecting to an ad hoc using a profile, refer to Create an Ad Hoc Profile using the Profile Wizard.
- Connect using an ad hoc profile. Refer to Creating a New Profile for details. Select an ad hoc profile from the Profile List and click the Connect button. This method uses a pre-defined ad hoc profile created by the Profile Wizard. The ad hoc profile is displayed in the Profile List. When joining an ad hoc network, the transmit channel established by the first computer is used. This channel may be different than the one selected when the ad hoc profile was created by the Profile Wizard.
Ending an Ad Hoc Session
To end an ad hoc session, click the Close button. After the session is ended, an attempt is made to re-connect to the last profile used from the Profile List.
Creating an Ad Hoc Profile Using the Profile Wizard
The following describes how to create a new ad hoc profile using the Profile Wizard and connect to an ad hoc network.
General Settings
- From the General page, click the Networks tab.
- Click the Add button. The General Settings dialog displays.
- Enter a profile name in the Profile Name field.
- Enter the network SSID, in the Network Name (SSID) field.
- Click Ad hoc operating mode.
- Click Password protect this profile to set a profile password.
- Click Next.
Security Settings
- Select either None, WEP for the data encryption.
- If WEP is selected, select either 64 or 128-bit for the Encryption Level.
- Select the key index 1, 2, 3 or 4.
- Enter the required pass phrase or hex key.
- If the Password Protection checkbox was checked on the General settings page, then
click Next to display the Password page.
Password Protection Settings
- Click the Password protect this profile checkbox.
- Enter a password in the Password field.
- Reenter the same password in the Confirm New Password field.
- Click the Back button to change or verify the settings or click Finish when you have completed the profile settings and return to the Networks page.
Connect to the Network
- Changing the default transmit channel from the Adapter tab: Unless the other computers in the ad hoc network use a different channel from the default channel, there is no need to change the default channel. If you want to change the default channel, click the Adapter tab, and click Configure under Ad Hoc Channel Selection. Choose the operating band select a channel. Click OK to save the setting.
- Select the Networks tab
- After creating the new profile, click the profile in the Profile List. Profiles using ad hoc mode are indicated by a computer icon next to the profile name.
- Click the Connect button to connect to the ad hoc network.